Thursday, November 12, 2020

Fall (Non) Layout Update

As the title of this post implies, progress over the past months has occurred mainly outside of the layout room. Since the push in the spring to move forward with a wide array of projects on the Cascade Sub, the past months have been spent in a time of "rest" focusing on railfanning, weathering, and enjoying the hobby outside of the context of the layout. Certainly there is more to come as the railroad continues to come to life, but enjoy this non-layout update for fall 2020! 

Railfanning

Prior to construction of the Cascade Sub, and arguably not since the last year, I would not have considered myself a railfan. My experiences consisted of occasional stops to see trains at a passenger station or glancing at a rail yard as I zoomed by. However, in the past months, railfanning has become much more of an interest for me and I hope will be influential in my modeling! 


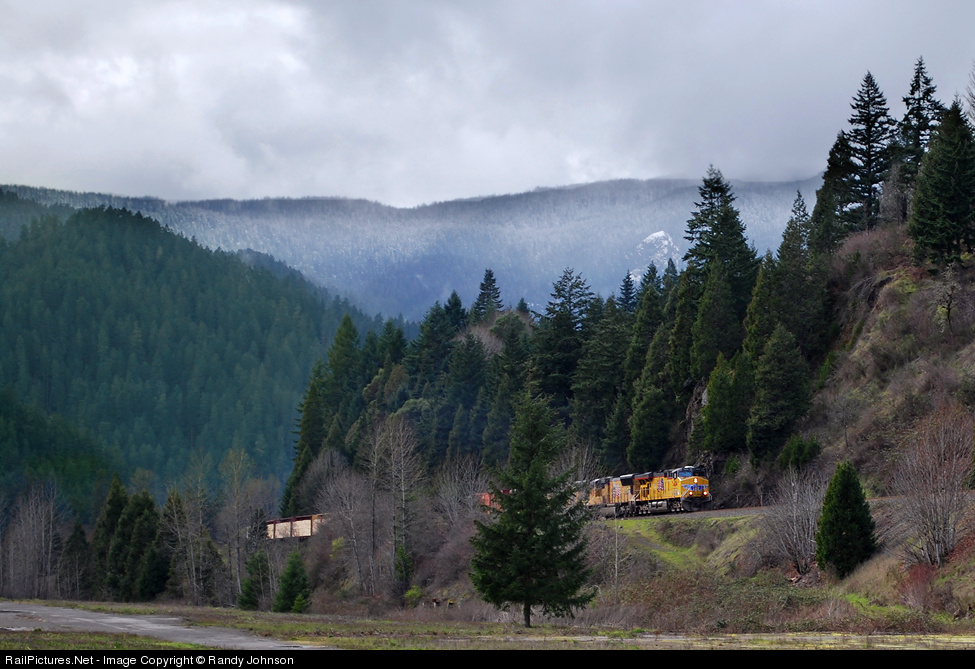
A Union Pacific intermodal train rolls through Vancouver on its way south into Portland. 

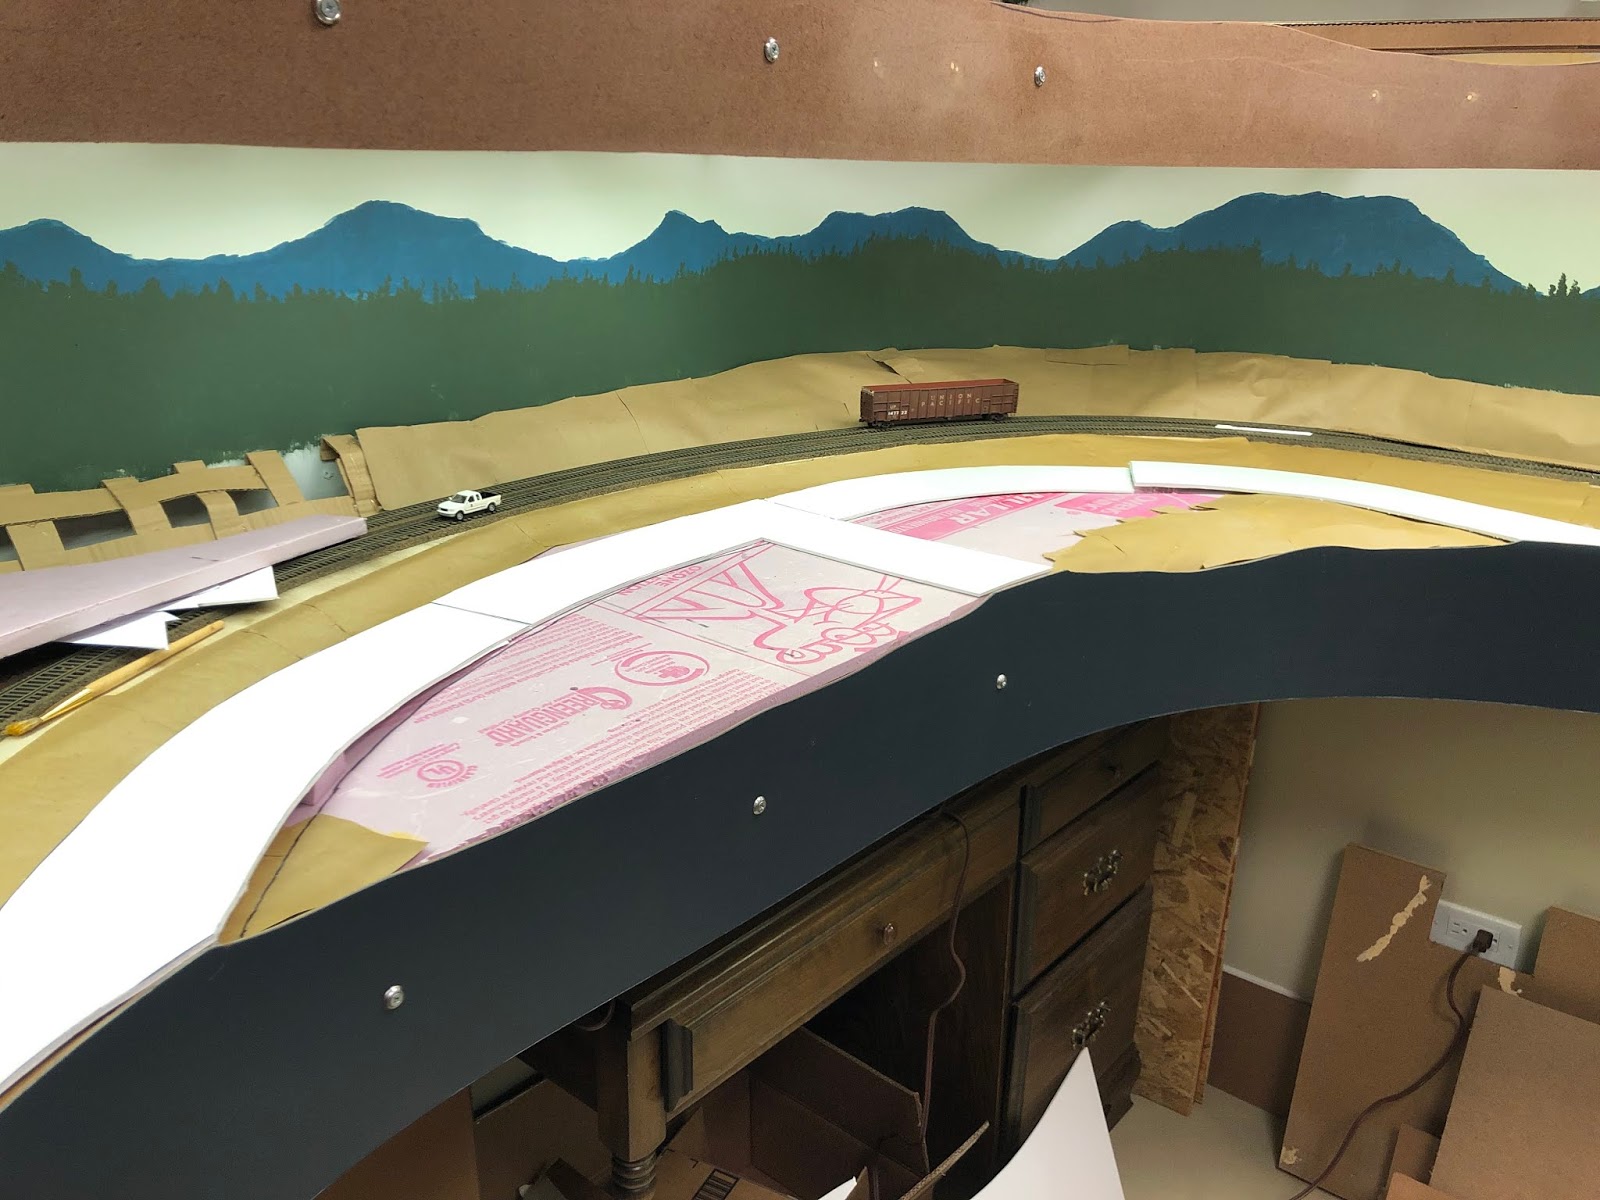
Travel has allowed significant time for watching trains on Marias Pass in Montana and more recently in Vancouver, WA and Portland, OR. Vancouver's Amtrak station provides an incredibly accessible vantage point to watch both BNSF and Union Pacific Traffic. Both of these railroads have sights of interest throughout the greater Portland area and further south into Oregon. Watching trains here has helped put operations and traffic on the Cascade Sub in the context of the region. I also hope the additional observation and reference trackside will help improve the realism and feel of my scenery elements. 

Weathering:

Stepping away from layout construction and scenery has provided the opportunity to make some much needed progress on multiple weathering projects. One of my major goals for the railroad is to have a weathered, modern fleet of cars and locomotives that gives place and purpose to trains running on the line. On one hand this means acquiring rolling stock that makes sense for trains in Oregon and on the other, making sure they are weathered and detailed appropriately. 


TCRR 32118 is a former BNSF paper box now leased by the fictional Tomko-Caffarelli railroad, a line that honors my grandfather and his role in assisting and inspiring my modeling pursuits. This project has been ongoing since January, however the model was recently completed with hand painted graffiti and reflective striping (not pictured). 


The first new project I took on this fall was weathering TBOX 660202, a newer run Athearn RTR boxcar. This model was fantastic to work with and is ubiquitous on manifest trains on the Cascade Sub. This model was mainly weathered with craft and artist's acrylics and weathering powders. I predict many more of these cars will find their way into my weathering shop in the future!


Additionally, I began the process of building a Canadian Pacific/Union Pacific grain train starting with this ScaleTrains.com Operator model. The operator line still provides extremely high quality models at an affordable price. This project is not yet complete as I stalled weathering the detailed and hard to access ends of the car. More to come with this project.


Finally, I have begun working earnestly on weathering two former Cotton Belt boxcars from the Athearn Genesis line. These cars come in Athearn's "Prime for Grime" scheme which includes faded paint and patching. These cars have a long way to go as the prototypes have significant rust and grime throughout the model, however they have been one of the most enjoyable projects I have undertaken in the recent months. I think these two boxcars that I plan to complete similarly will be a great addition that alludes to the Cascade Sub's Southern Pacific heritage. Again, more to come on these models. 

That wraps up the non-layout update for the fall. Certainly a good time for certain projects that otherwise would not be possible given the focus on layout construction. I plan to return to scenery efforts in the coming months as time allows. Stay tuned for future updates!

Also, here is a layout tour I recently published to YouTube detailing the scenes and scope of the Cascade Sub. 


Thursday, August 20, 2020

Summer Progress Update

This update follows a long summer (and spring) of progress on the Cascade Sub. Given school closures and stay-at-home orders, the past months have been the most productive in the layout's brief history. Most notably, scenery is well underway on the lower level in Oakridge and Westfir, and the entire layout is operational with the recent completion of Klamath Falls Staging. 

Early in the spring, attention was devoted to installing fascia near the entrance to the layout to give the duck-under area a more finished look. A good amount of work is still to be done in this area, however fascia installation along the middle level (Fields, OR) and subsequent installation of LED lighting allowed for significant scenery progress in Westfir and Oakridge. 


Fascia, Lighting and Scenery installed in Westfir. 

In Oakridge, the neighborhood scene saw the most significant progress. Terrain was followed closely by installation of the main road, dirt and ballast, and grasses. Structures for the scene are in progress. This is an area with great modeling potential given its depth. I look forward to bringing this area closer to completion in the future!

Scenery in the Oakridge Neighborhood.

Progress in the Oakridge yard was minimal, however a realignment of the geo-west wye leg into an additional double ended locomotive track has greatly improved operational efficiency. 

New yard alignment in Oakridge.

With the completion of Klamath Falls Staging and the mechanical functioning of the upper level, terrain forming began near Summit. While this step may seem out of sequence, this is mainly a form of protection to prevent equipment from falling many feet to the floor should a derailment occur. Much of this work was accomplished during a work session with fellow modeler Cam Nealy (railfan220 on Youtube) who has a beautiful modern BNSF layout, the Plains Division. 

Terrain forming at Summit. 

With the railroad functioning properly, I have turned my attention to filling out the locomotive roster and freight car pool. I will share these acquisitions as they are weathered and placed into service. Two new locomotives of note are the new ScaleTrains.com Tier 4 Gevos that were released this summer. Both of these engines have been weathered and are in service on the Cascade Sub mainline. ScaleTrains installed full lighting packages into this new run which include LED headlights, ditch lights, walkway lights, number boards, and ground lights. 

Newly weathered ScaleTrains Tier 4 Gevos. 

I am once again away from the railroad itself for quite some time which will impact progress significantly. Despite this, I have many weathering and structure projects in the works that are able to be accomplished remotely. I look forward to sharing these as the weeks and months go on. More to come from the Cascade Sub!

Wednesday, June 17, 2020

Reference Expedition

This past week I was fortunate enough to spend a day exploring and documenting the locations of the Cascade Sub in Oregon that I am modeling. It was an incredible opportunity to see the line in person for the first time and start to accumulate photos and videos to enhance my modeling efforts. Below are just some of the highlights!

Westfir - Bridge over the Willamette.

Westfir - Looking south towards Willamette and Tunnel 22

Oakridge - UP's yard which serves as MOW hub for the line. Many of these small sheds will be modelled.

Oakridge - Power idling on the south end of the yard. Scenes like this will be replicated in my version of the town.

Between Wicopee and Fields - Representative of scenery on middle level of railroad.

Cruzatte - Cascade Creek falls under the mainline and siding at Cruzatte, high up on the line. 

Cruzatte - Tunnel 6 and the north control point will not be modeled per se, but scenes like this will inspire much of the scenery work on the upper level. 

Cruzatte - North end control point. 

Tunnel 6 - The north portal just south of Cruzatte. 


These and other photos will serve as valuable resources in my future modeling projects, however a future trip is already in the works to visit this beautiful railroad in order to experience more of the line. Next, back to work on the layout with this new inspiration!

Monday, May 18, 2020

Oakridge Neighborhood - Painting Commercial St.

Once the terrain was formed and plaster dried, I worked on bringing the roads in Oakridge to life with  painting and weathering. Like many of my painting and weathering projects, my techniques and materials were chosen for simplicity and repeatability. The end result was a surface realistic to Commercial St. completed without much fuss. 

I started the project studying prototype photos. I used "street-view" functions on the internet and took screenshots of desired textures and colors  I wanted to replicate from the actual road. Commercial Street, which parallels the tracks, seemed to be a lighter asphalt-gray color with elements of light browns. Aged, but not poorly maintained. This final look would be achieved with weathering. 

I used a wash technique to paint the base color similar to that I use when weathering equipment. This involved "building" color by applying multiple thin washes to achieve the desired look per prototype photos. Additionally, washes for both weathering or in this case painting allow for any sort of tweaking of color should it be needed. The base color for commercial street was achieved with 4 washes of a tan-gray color. 


The base coat applied to Commercial St. I worked in small sections at a time. 

The final wash was a dark brown-black mixture used to begin the weathering process. I have previously scribed expansion joints and other cracks and the wash helped to bring out these details in the road surface.

Commercial Street has a distinctive tar pattern along the major expansion joints and cracks. I replicated this by hand, painting over these joints and cracks with a dark gray water mixable oil and a fine brush. Here I used prototype photos extensively for accuracy. Note however, I did not replicate any one section of road, but merely used photos as reference to ensure realism in my final result, if not an exact replica.


Tar painted with dark gray oils along previously scribed joints and cracks.

I then followed this detail work with an additional black-brown wash to help blend the newly painted tar lines into the rest of the pavement. This did not obscure any of the previous step, but merely softened the distinctiveness of the painted tar lines. 


Second wash of brown-black applied and still drying. 

I used weathering powders to finish the coloring and weathering of the road. I began with light browns and grays to give a dusty look, especially along the shoulders and along the middle or crown of the road. I also used a fine brush and dark brown powder to highlight some of the expansion joints. All this was blended with a large, soft brush.


Weathering powders applied to lightly weather and age the road. 

With scenery still to come, it remains to be seen how the road will fully integrate into the scene, yet the initial results are encouraging!


The finished road without additional vegetation. To my eye, the road stands out rather harshly compared to the plain dirt texturing, but maintains a realistic look. 


A sneak peek in to what is to come in Oakridge. Here, the road is much more an integrated element in the scene!

Sunday, May 10, 2020

Westfir Scenery - Trees

After the initial application of grass and bushes, it was time to begin the vertical scenery development: trees. It is no big secret that modeling northwestern mountains requires a great deal of trees. I predict that my railroad fully finished could consume 1-2 thousand individual trees, although this may be a conservative estimate! In Westfir specifically, the tracks run through a "tunnel" of trees before entering Tunnel 22 itself. This tunnel made of a foundation of conifers, however a good proportion of the trees are deciduous. Modeling this dense, spring vegetation proved to be a great artistic challenge in my narrow scene.

I began adding trees on the ridge above Tunnel 22 with conifer trees I had on hand from a previous railroad. I did apply a fresh coat of foliage to give the trees a refresh, however these served as a great foundation for the rest of the scene even if they are not the most outstanding models. Each tree has a mounting pin and is held in place with hot glue.

Conifers placed as a foundation for the rest of the vegetation in Westfir. 
I used Supertrees material and SuperLeaf leaves for the deciduous trees. Given the springtime setting I chose the two lightest greens shades for leaves. The armatures are painted gray and spray adhesive is used to adhere the leaves to the armatures. The leaves are applied lightly to imply trees that are in the process of leafing out.

Starting to add spring deciduous trees to the tunnel. These go a long way in giving the scene depth.

As I worked down the hill, I started to plan future locations of conifers. My approach to conifers may be unique, at least among other railroads I have seen. I am looking to model trees that are close to accurately tall. As you can see in the next photos, the trunks of these future trees seem to tower over the seen. This is exactly the look I am going for and hope it creates a dramatic yet realistic mountain feel.

Working with composition of conifers. Still uncertain on arrangement, but note the height of the trunks!

On the other end of the scene I started to add deciduous trees on the narrow slope. The Supertrees material added a great sense of depth and created the densely vegetated look I am seeking to achieve. I will further this area with a future application of bushes and shrubs.

Trees added to the narrow entrance to the layout from staging. I will eventually finish this area with fascia.

Trees ready to be placed in the scene. 

Deciduous trees added near the liftout. The distance from the tracks to backdrop is only 2-3 inches here. 
 A large conifer was constructed for near Tunnel 22 and more deciduous trees were added. I decided to not block the view of the tunnel with the large conifers I was fitting into the scene earlier. I will use low deciduous cover instead.

Vegetation around the tunnel continues to develop. More is needed, but this is close to the final state. 

Overall view of Westfir in its near complete state.
As the scene stands a majority of the main trees are in place. I would like to add a few more conifers and will need 5-10 more deciduous trees to continue to fill in. So far I am pleased with the springtime colors that are starting to develop and the once bright green grasses are starting to become more integrated into the scene given the complimenting leaf colors. This area is not yet complete, but very close to being finished for now. I will continue to post updates as they develop.

Monday, May 4, 2020

Oakridge Neighborhood Terrain Development

Leaving Tunnel #22 trains enter Oakridge via a large sweeping curve that takes the mainline and passing siding near the backdrop. Within this "bubble" of track will reside a small residential area that will seek to capture the residential aspects of Oakridge with a few small homes and streets. As terrain development and scenery reached completion in Westfir, the neighborhood was my next area of focus.

I began with completing the terrain structure with cardboard webbing and construction paper. The paper was coated with wood glue to add some strength.


Cardboard webbing and paper around Tunnel 22. 


Webbing completed for the entire area. 


Wood glue drying on the paper layer. Locomotive on siding gives a good impression of how deep this scene is. 

With the basic terrain forms in, I used foam board to create a subroadbed for the streets. This was secured with hot glue as well. I then smoothed edges and transitions with multiple layers of Sculptamould.


Foamboard subroadbed cut and fit resting in place. 


Shoulders and other terrain features created with Sculptamould. 


Additional paper was added where the road elevation rises to meet the fascia. 

With the Sculptamould complete, I then added Commercial St. and Locust St. using Woodland Scenics Smooth-It.


Streets poured in Oakridge. I used Woodland Scenics Smooth-it as I have used it in the past and have been pleased with the results. 


Built up the area for an access road off Commercial Street. 


Foamboard was used to create foundations for the homes, driveways, and sidewalks on Locust St.  


I applied 2-3 layers of Sculptamould throughout the scene in order to properly shape the road shoulders and other transitions. 


The entrance to Oakridge, the other side of Tunnel 22 also received a good deal of carved rocks to match the Westfir side. 


Entire scene painted with brown craft paint save for the roadways and house foundations. 


Base rock color of gray applied around Tunnel 22. 


Brown and black washes finalize the rock painting. Additional color details added with dry-brushing. Powdered dirt will help to weather the rocks further and blend them into the scene. 

With terrain and rockwork complete, further work can be done to develop the scenery in Oakridge. 

Monday, April 27, 2020

Westfir Scenery - Base Vegetation

With the terrain in Westfir completed, I began to explore options for adding spring scenery. Most of us model the heat and bright sunny days of summer, however, the Cascade Sub is firmly set in the rainy days of late April and early May. As such, there are a few more considerations when it comes to developing the scenery across the layout. For one, I have to be selective about color and texture, but also elevation. As scenery progresses up the hill I will reduce the level of lushness simulating the delayed response of vegetation at higher elevations. 

Reference material available online and through others has been an incredibly valuable resource in putting together the pieces of this scenic challenge. Below are two pictures of the prototype Westfir which I am using as primary reference. A few things stand out to me as "must have" elements. First, hillsides dominated by conifers. Important to note are the somewhat lighter green tones that can be seen, especially in the first photo. Given my small space and the narrow width of the scene, trees will have to interact well with the backdrop and foreground to give the impression of ubiquitous conifer growth.  

Secondly, bare and budding deciduous growth is the prevalent, despite the conifer dominance. Trees, bushes, brush, and shrubs are all in early stages of leaf development. In Westfir this development will be represented by greater lushness than at the summit.  

Finally, grass are lighter shades of green with deeper green areas where more growth has occurred. Blends of light greens and yellows will help achieve this early season look. The challenge will be to balance the bright colors such that the scene does not appear cartoonish. 


UP mixed freight through Westfir (Randy Johnson).


 Westfir (Randy Johnson).

Much of the textures and complexity found on the prototype and in the photos above would be nearly impossible to replicate well, so my focus will be executing the major springtime characteristics well. I started with the grasses. After testing a small section, I proceeded to add 4mm spring green static grass from Silflor along the fascia side of the right-of-way. The grass is held in place with full strength white glue applied with a brush. Silflor tufts were also added along the spur with white glue. As can be seen in the photos below, this growth is relatively lush and will need to be balanced with future scenery work, specifically conifers, still dormant foliage, additional grass layers and ground textures such as ground, dried leaves. 


Grasses and tufts added in Westfir. Adhered with white glue applied with a brush to the dirt. The grass is not a uniform blanket, rather a series of connected clumps.


Grass and tufts applied along the spur. Here it is evident the scene needs more color variation as it is currently dominated by the grass and dirt colors. Additional variation with other vegetation as well as differing shades of static grass will help. 


Even a narrow scene provides a multitude of opportunities for scenery.

Certainly there is a great deal of scenery to add to this scene, however these initial layers of scenery have gone a long way to bringing the railroad to life. Future posts will detail how this scene progresses as more scenic elements are addressed.