Thursday, December 29, 2016

Santa Builds Benchwork

The week before Christmas, and the days right after found a great deal of time to make a concentrated effort on completing a majority of the benchwork on the railroad. We implemented a few new techniques on the upper levels and found these to be very effective. Next up, all the Masonite: spline, fascia, and backdrops.

Fields: The passing siding at Fields is the main attraction, apart from the mountain scenery, and the scene is very narrow, average of 9 inches along the wall. Taking this into account, we opted to use as much material that we had on hand, opting for simple wooden brackets similar to those used by Bill Decker on his Cascade line.  These tie directly into the studs and for the most part seem to hold up extremely well.


The corner of the room and end of the Fields siding is much deeper, so we reverted back to our original construction utilizing a 1/2" plywood wall plate and 3/4" supports held together with steel brackets. While this method is extremely strong, the amount of hardware used is immense.


Continuing up the hill the grade begins to kick up again and the stretch between Fields and Cascade Summit is true mountain railroading with a tall trestle and numerous tunnels. Similar methods were used on this portion of the climb as before, taking into account trestle and tunnel locations, as well as mountain scenery. Spanning the window was a necessity and a nearby window in the workshop offers escape opportunity in case of emergency.


Crew member Pete Tomko gets ready to install benchwork on the run to the summit.


Can see the rise in the benchwork as grade climbs upward. Scenery to ceiling in this area.


Low head clearance here, but solid support for Fields.


Approximate location of Noisy Creek trestle.

Finally we decided to rework the support for the peninsula, as our original idea of 2x4 supports were not sufficient enough once we tried to attach supports. In addition, the area is more complex then initial inquiries revealed as it must support four different levels of track. Our new design should support the railroad in a more efficient fashion.


Compare to early photo. Can clearly see the 4 levels and where supports will go.

Stay tuned for continuing progress into 2017!

Tuesday, December 20, 2016

Late 2016 Post: Year in Review

Well it has been a very long time since the last post and life has been equally busy. Despite the craziness, still found time to get to the basement out of the summer heat and subsequent winter cold, and get some things accomplished on the railroad. Starting this project, I really didn't have a general idea of how fast things would move and how far we would be in roughly a year, but we have reached that point and I am actually quite surprised. Yes, only, Eugene staging trackwork is complete with wiring almost fully in place, not to mention benchwork is roughly 50% done, but mentally the project is further along. Initially I was concerned as this is my second railroad and is substantially more complex and involved than my previous one, but getting over major hurdles has been great for the morale of the entire crew (me, myself, and I, and not to mention a few family members).  Don't get me wrong, there is still a long way to go and we are nowhere near where we want to be or where we will be, but we have made a great start. Without further to do, here is a summary of the summer and few days ths Christmas break in the Cascades.

Eugene Staging:

Work at Eugene staging is furthest along with all of the benchwork, cork, track, and 75% of the wiring complete. Earlier in the summer I finished all the turnouts, east and west ends. Fasttracks make a great product--handlaid track is hard to beat financially and operationally. Finished laying track earlier this week, dropping feeder wires as I go to save time later. Was able to mount 4 of the 5 Tortoise machines on the west end and all 4 on the east ladder.

Wiring has begun in full force. All the detection blocks are wired as well as the common rail. Splice tap connectors made the work go by very quickly and zip ties make life clean and neat. Wire for tortoises is en route and will be wired into the DS64's before the new year.

Pictures:


Wiring of west staging ladder


East ladder trackwork

 Stacked reversing loops


 Looking west


 East ladder tortoises


 Zip ties and wire clips


Splice taps and zip ties


Westfir to Oakridge:

Benchwork installed for the run out of staging into Oakridge. Spline is on the project list for this week. Run will include a spur (undetermined use still) and a tunnel before making the turn into Oakridge. Scenary along this stretch will be simple with focus on the right of way, drawing visitors to the trains and the explore further into the railroad. Operationally this stretch is singletrack, look for meets at the outskirts of Oakridge and the local out of Eugene to service this mainline spur.

Pictures:

Grade from Westfir into Oakridge. Spline coming


Oakridge:

Work is yet to start on the town of Oakridge, but look for benchwork to commence in the new year for the major operational hub of the railroad. Pope and Talbot Lumber Company (no longer exists on prototype) will offer a chance for switching with a dedicated switcher and yard. In addition, Oakridge will serve as the line's MOW facility and will in turn have dedicated trains running the line making repairs in the summer and plowing operations in the winter. Though no longer in service, Oakridge will be HQ for manned helper operations and most trains will stop on the long siding to tie on helpers before going over the hill.  Definitely a spot of interest and activity adding the feel of big operations and lengthening the run of the small railroad.

Oakridge to Salmon Creek:

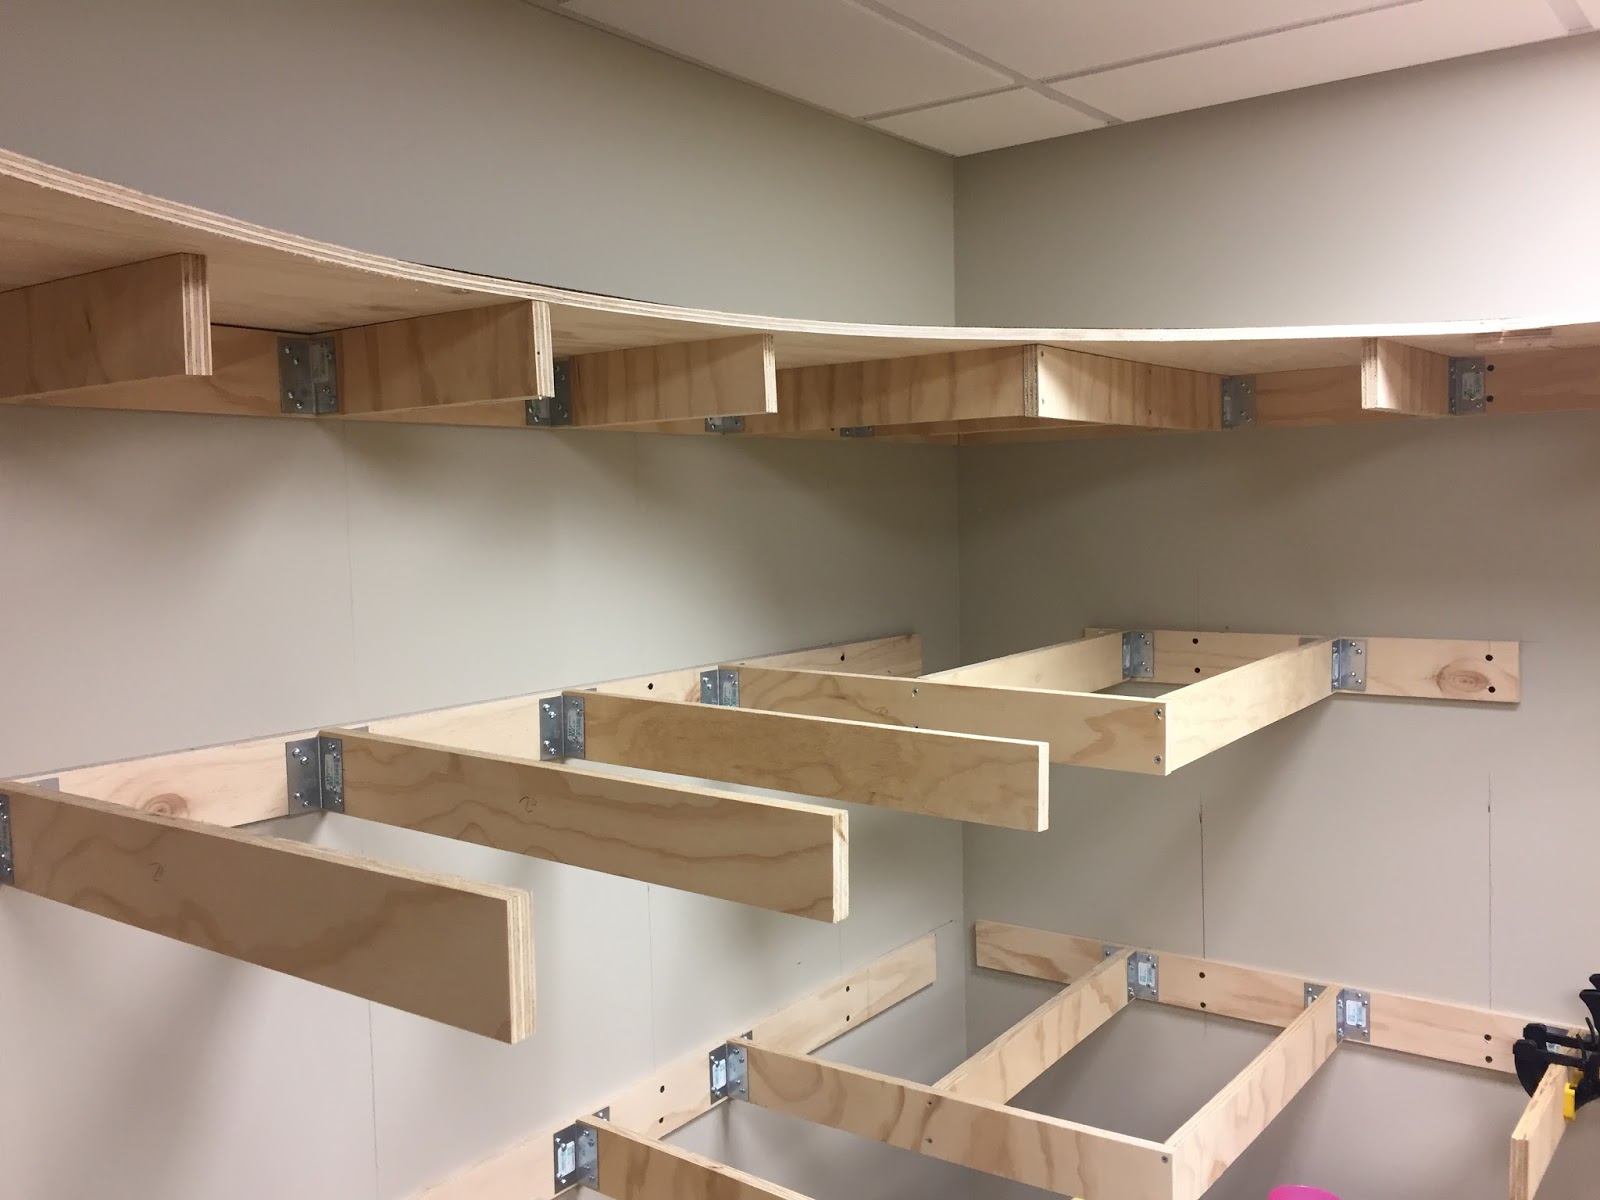
Wall supports are in for Salmon Creek area, which will serve as the entry way into the mountains and the helix.  Horizontal supports to come next, an easy install.  Here trains will be hitting the 2.5% grade right out of town and into Tunnel 22 before emerging on the other side of the helix, Tunnel 20.

Helix is almost complete, just need to complete wiring and scenic the top level. Huge milestone to get passed. Special thanks to my uncle and grandfather for their hard work this summer to get that complete.

Picture:


Cascade Summit will sit atop the structure itself.

Wicopee to Fields:

The heart of the Cascades. No true work has been completed here, should begin in a few weeks. Narrow shelves along the walls for most of this stretch featuring 5 tunnels. Fields is home to the only passing siding on the line which will be a great location for trains to meet, or MOW crews to get off the mainline.  Many, many trees and rock formations for the area. Should be a major factor in transporting guests to the region.

Fields to Cascade Summit:

After the 1.25% grade of Fields, the slope kicks up again to the summit, a total 77 inches off of the floor. The single track run will feature 5 more tunnels and a trestle across Noisy Creek. Expect mountains formations to stretch almost to the ceiling and trees to touch the tiles. No benchwork done yet, but looking forward to working on this stretch.

Klammath Falls:

Benchwork complete and cork complete. Trackwork and wiring to come.

Pictures:


Looking east, downhill

Klammath reverse loop, directly above loop in Eugene.


To-Do list:
1. Install Spline from Westfir to Fields
2. Finish Eugene Wiring
3. Benchwork from Wicopee to Summit
4. Klammath Falls and Oakridge

Happy Holiday's!


Wednesday, April 20, 2016

Spring Update

A busy spring has slowed progress on the railroad dramatically. Goals for February were pushed into March, and then into April. Despite this, some progress has been made. I will quickly run through what has gotten done, and my plans for the summer.

First is the upper staging, Klammath Falls, benchwork. This is a flipped version of the lower benchwork, so the cuts and layout of the wood is already complete. The top loop poses an engineering issue, and it hangs quite far out from the support. I am considering running a few threaded rods down from the ceiling for extra support and rigidity.


View of the benchwork for upper reverse loop.


Progress on the MEC boxcar has been steady as well. I was able to finish weathering the roof and start on the trucks. For the roof, I first painted the entire surface with a Tamiya gray. The paint covers well and adds a good, dull coat to the roof surface for additional weathering. Next, using a dry-brushed stippling technique, I added the rust spots, using burnt umber and raw sienna. The burnt umber represents older rust and the sienna the newer. Remember to build up in layers for the best effect.


I hope to finish the car up before the summer and then move into a few locomotive projects.

Finally, the new workshop area has been completed. Features include two work stations, amble drawer storage, a large pegboard for tools, and LED strip lighting. The new shop will allow me to move my current old desk out of the layout room and I can begin working benchwork into Roseburg.


For the summer, the goal is to finish the staging yards. With a lot more time to work and a better organization system, I expect progress to move along at a faster rate than it has as of late. Please stay tuned and feel free to comment and ask question if there are any.

Tuesday, February 16, 2016

MEC 31562

In between laying cork, building benchwork, and fiddling with turnouts, I have begun to weather this Maine Central boxcar that has been sitting on my workbench for a while now.

My methods are fairly simple and easy to master. I joined the Rustbucket forum and have adopted many of the practices of the masters there.  I will walk through the initial weathering of this care step by step, explaining each phase.

Right out of the box the car looks as follows, like a toy, shiny and plastic. Our goal is to create a model that looks like a large hunk of metal. To take the shine out and create a surface for later applications, first spray a coat of Dullcote onto the model. This knocks away the shine and creates a nice "tooth" for our fades to grab on to.


The next step is fading the model. After removing the wheelsets and applying Dullcote, I create a wash of the color similar to the one I want to replicate on the final model. For this model I mixed a golden yellow, tan, and burnt umber. I then apply thin washes over the entire model, using a hairdryer to speed the drying process.  The end result is a finished product that looks sun-faded. Again, I seal the model in Dullcote.


Next, I begin initial coloring with powders. I use AIM Weathering powder and prefer Medium Earth and Dark Earth. I alternate between the two coloring in dirt on the lower portion of the model and also initial rusting around the door. Start light and work darker.


The next step is where the model goes to the next level.  Using prototype photos, burnt umber, and a sewing needle, I begin to paint the rust marks and patches.  This prototype didn't have much scratching and patches, but there is some visible on the door and on the door track. Using a needle in addition to a small brush gives a great look.


The next and final step for this initial weathering is to go in again with the powders and touch up the painted rust spots and add a secondary layer of grime to the model. Using smaller brushes, I continue to apply powders and rust  (and of course Dullcote) until I get the look I want.


This model is almost done.  In further posts I will cover weathering trucks, the sides, and a little graffiti painting. Hope you enjoyed!

Sunday, January 31, 2016

Late January Progress Update


After a relaxing and rejuvenating holiday season, life has returned to normal (aka less train time). Despite this change in schedules some progress has been made on the Eugene Staging. 

Early in the month I received an order from FastTracks with all the necessities to begin building turnouts and after a tool swap (customer service is fantastic) I was able to start building some turnouts. I have four built so far, and each has gotten progressively better in quality. I will admit to not being an expert and I imagine spending time later perfecting my early attempts, however the jig and tools allow for quality pieces of trackwork to be produced in a short amount of time. Below is an example of a right handed #6 sitting on the new cork in Eugene.


Yes! Cork has arrived. For roadbed I found myself in a toss up between cork and Homabed. Cork eventually won out because I have used it before and my local shop offers a constant supply. I have found that clear caulk is the best adhesive, as the cork is easy to pry up in the case of realignment.

One box of Midwest Products Cork when a fairly long way completing about 70% of the roadbed in Eugene.


Here is the beginning of the west ladder in Eugene.


Tracks 1, 2, and half of 3 at the east ladder.


Looking west at tracks 1, 2, and 3


This curve needed to be realigned, a simple project to fix a simple mistake.


Quick spacing test with some rolling stock. The MEC boxcar is a current weathering project. Stay tuned for more about that.


Two inch track centers leave just the right amount of room.


East yard ladder early on.


The finished east ladder.


West end receiving some realignment.


West ladder.

I have three goals for the upcoming month: The first is to finish building turnouts for Eugene. I have 5 more to go and can do one in just over an hour. Secondly, I hope to finish the cork work in Eugene. What's left will take an afternoon. Finally, Klammath  Falls needs to be constructed. Klammath Falls is the other staging yard railroad west of Eugene (south) however it hangs at 77 inches off the floor. It is a mirror image of Eugene and shouldn't be too complicated to construct. 


Sunday, January 3, 2016

Eugene Staging Begins

Merry Christmas! After a busy fall significant progress on the railroad could actually begin. Because of the design of the railroad, the staging yards will be built completely (benchwork, track, wiring, etc.) before connecting them with the other decks.

Earlier in the summer I built the freestanding wall and put in it place where it has "stood" since. Visitors weren't quite sure what to make of the "weird thing in the corner," adding motivation to get some progress made.

The goal of the benchwork design is for the railroad to appear as if it is floating, minimizing leg supports and opening up the aisle ways. I ran across "the plywood benchwork" method (http://www.kingstonsub.com/mr-construction-benchwork.html) and immediatly knew the sleek design and minimal depth was what I was looking for.

Since the walls of the layout room are covered in drywall and not plywood, I mounted 4" strips of 1/2" plywood ripped on my table saw to the studs with 1 5/8" decking screws (have 2 boxes laying around from previous project).


Next, I completed the supports on the freestanding wall section for the subroadbed. These are 3" strips of 1/2" plywood. Two screws into the 2x4 hold these up very well.


I then moved on to the supports for the back of the reversing loop that would run against the wall. I mounted square piece of plywood to the wall strip using small steel angles. For lightweight, simplified construction, steel angles are the way to go.


Unfortunately I neglected to take pictures of the benchwork in progress for the main body of the staging yard but the following pictures should show the process we used. Again we mounted our strip of 1/2" plywood on the wall, this time using a 4" strip instead of the 3". Then, every foot we mounted supports made from a 4" strip of 3/4" plywood with larger steel brackets. Each support has 2 brackets, creating a very sturdy support. 

In the picture below, we used the strip of mdf board we had to find the curve for the subroadbed.  This created a very smooth curve that fit exactly where we needed it to be.  


Below is the first piece of plywood subroadbed we cut and installed.


A good plan makes work easy. Here is the plan for the lower layout which we used as a guide for our subroadbed.


After we finished installing the subroadbed, I added the risers to create the grade that starts in staging. Though slight, the grade is fairly continuous throughout the entire length of the mainline, making for a truly realistic mountain railroad. The blue tape marks on the wall mark the studs behind the drywall. Also, the two large outlet panels are where the DCC control station will plug in and where the layout lights will plug in. Each outlet on the panels is controlled by a separate  wall switch on the outside of the room.


Here's a good view of the construction method. We stopped progress where we did opting to wait to bridge the gap across the doorway until a later date, preferring the 4' opening we have now to the 24" swing bridge.


A look at the plywood subroadbed as it curves around the corner. Both curves were made with the mdf sitting below the layout.


Here is the reversing loop. Again the mdf created a seamless and smooth transition. 


This final photo is of the only section where we had to use legs, the window. Unfortunately we couldn't avoid a window in the room and though this created a need for a little creativity, the small "table" built to support this section of staging turned out nicely. In hindsight, I should have used the legs to support the middle deck (Oakridge) at this point, but will cross that bridge when we get to in in the future. 


Overall I am very pleased with the progress made in a period of about 4 days. Next up as far as progress is building the nine turnouts using Fastracks products, laying cork roadbed, and then track. That work will probably take me up to late winter or early spring when I will start with the electronics. My goal is for the yards to be fully automated with sensors and turnout controls allowing operators to run trains effectively blind. Hopefully sometime in the summer we will start work on the upper staging yard, Klammath Falls, and then begin to connect the two with the main layout, the run up to Cascade Summit from Oakridge.  

Also stay tuned for some detailing and weathering projects that are currently in progress.